HOMEMADE NUMBER STATION


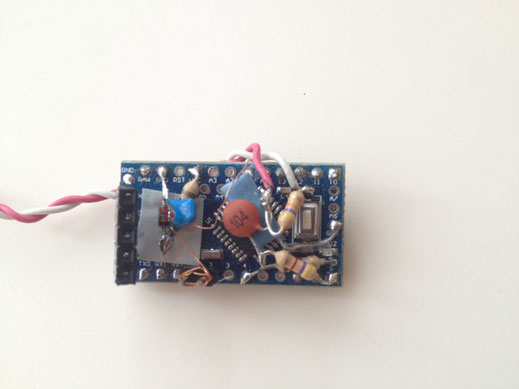
The circuit is just an Arduino connected to an SD card reader. The supply voltage for the SD is obtained using a zener regulator. The audio synthesis is carried out on a PWM pin either via 8 or 16 bit sampling and an RC high pass filter. The white and red wires are the audio output (signal+ground), while the strip connector is used for ISP and power supply. The system is able to read out vocal messages stored on the SD card using NATO alphabet at set time intervals or when a specific trigger pin in pulled low.

The SD contains the following items:

  • a folder with 26 + 10 (letters and numbers) wav recordings of characters read out according to the NATO alphabet and some special sounds.
  • a message.txt file containing the message to be read out: the arduino reads the message from the SD charachter by character and plays the corresponding wave file.
  • a settings.txt contains the configuration of playback intervals, special sounds and trigger inputs
  • a txcount.txt file is generated to log and count every transmission 

Also, the transmission channel can be kept occupied even when a message is not being sent by playing a user selected sound at short intervals (the BUZZER). The code is able to autoreset the arduino in case of fault.


#include <MemoryFree.h>

#include <avr/pgmspace.h>

#include <EEPROM.h>

#include <Sleep_n0m1.h>

#include <SD.h>                   

#include <TMRpcm.h>           

#include <SPI.h>

#include <avr/wdt.h>

#include <avr/pgmspace.h>


#define Reset_AVR() wdt_enable(WDTO_500MS); while(1) {} 

#define SD_ChipSelectPin 10

#define audiopin 9

#define pttpin 4

#define triggerpin 2

#define letterdelay 80

#define numberdelay 190

#define spacedelay 500

#define warmup 100

uint8_t telemetryflag;

uint8_t interval;

uint8_t occupyflag;

uint8_t opmode;

uint8_t s=0;

char buf[8];

char buff[9];

char msg[200];

const char string_1[] PROGMEM = "a/sa.wav";   

const char string_0[] PROGMEM = "a/a.wav";

const char* const string_table[] PROGMEM = {string_0, string_1};


TMRpcm audio;  

File myFile;

Sleep sleep;


void setup(){

                                                                           // Serial.begin(9600); 


if(opmode!=2){pinMode(triggerpin,INPUT_PULLUP);}


audio.speakerPin = audiopin; 

audio.quality(1);

audio.volume(5);


if (!SD.begin(SD_ChipSelectPin)) {  

Reset_AVR();}


recallsettings(); 


strcpy_P(buf,(char*)pgm_read_word(&(string_table[0])));

strcpy_P(buff,(char*)pgm_read_word(&(string_table[1])));


tone();

delay(300);

tone();

}


void loop(){ 


          if(opmode==1){

          sleep.pwrDownMode();  

          sleep.sleepInterrupt(triggerpin, FALLING);

          if(telemetryflag==1){s = collectdata();}

          transmission();

          }


          if(opmode==2){

          tsleep(interval);

          if(telemetryflag==1){s = collectdata();}

          transmission();

          }


          if(opmode==3){

          trsleep();

          }


          if(opmode==4){

          delay(interval);

          }


}


uint8_t collectdata() {

pinMode(A0,INPUT);

analogReference(INTERNAL);

delay(500);

uint8_t v=0;

for (uint8_t l = 0; l < 5; l++){

v = v + analogRead(A0);        

delay(200);

}

uint8_t tempC = round (10*( v /( 5* 9.31)));

return tempC;

}


void senddata(){

send('t');

send(char(((s/100)%10)+48));

send(char(((s/10)%10)+48));

send(char(((s)%10)+48));

playtone('_');

}


void send(char c) {


if (c == '_'){

playtone(c);

return;}

if (c == ' '){

delay(spacedelay);  

return;}


buf[2]=c;

audio.play(buf);

while (audio.isPlaying() == 1){delay(5);}

if (uint8_t(c)>47 && uint8_t(c)<58){ 

delay(numberdelay);

return;}

delay(letterdelay);

}


void sendmsg(char *str)

{

while (*str) {

send(*str++);

                             //   Serial.print(F("Free RAM: ")); Serial.println(FreeRam());

}}


void recallsettings(){


myFile = SD.open("settings.txt");

if (!myFile) {Reset_AVR();}


interval = myFile.parseInt();

telemetryflag = myFile.parseInt();

occupyflag = myFile.parseInt();

opmode = myFile.parseInt();


int i=0;

char a;

while (myFile.read() != '[') {delay(1);}

msg[i] = myFile.read();

i++;

a= myFile.read();

while (a!=']') {  

msg[i]=a;

i++;

a = myFile.read();}

msg[i]='\0';

myFile.close();

}


void txcount(){

long w =0;

myFile = SD.open("txcount.txt");

if (myFile) {

w = myFile.parseInt();

}

myFile.close();

w++;

SD.remove("txcount.txt");

myFile = SD.open("txcount.txt", FILE_WRITE);

if (myFile) {

myFile.print(F("Transmissions counter ["));

myFile.print(w);

myFile.print(F("]"));

myFile.close();

}

}


void tsleep(uint8_t t){  

for (uint8_t i=0; i < (t*60000)/2000; i++){

sleep.pwrDownMode(); 

sleep.sleepDelay(2000);

if (occupyflag==1) {tone();}

}}


void trsleep(){  

while(1){

sleep.pwrDownMode(); 

sleep.sleepDelay(2000);

if (occupyflag==1) {tone();}

if (digitalRead(triggerpin)==LOW){

delay(50);

if (digitalRead(triggerpin)==LOW){

if(telemetryflag==1){s = collectdata();}

transmission();}}

}}


void playtone(char t) {


if (t=='_'){

delay(300);

buff[3]='h';

audio.play(buff);

delay(500);

audio.disable();           

delay(600);

return;}


buff[3]=t;

audio.play(buff);

}


void tone(){ 

digitalWrite(pttpin,HIGH);  

delay(warmup);

playtone('l');

delay(500);

playtone('h');

delay(250);

audio.disable();       

digitalWrite(pttpin,LOW);    

}


void transmission(){ 


        digitalWrite(pttpin,HIGH);

        delay(warmup);                    


        playtone('m');

        while (audio.isPlaying() == 1){delay(5);}

        playtone('_');

        playtone('_');

        playtone('_');

        sendmsg(msg);

        playtone('_');

        if (telemetryflag==1) senddata();

        playtone('_');

        playtone('_');


        txcount(); 


        digitalWrite(pttpin,LOW);


}


Comments: 30 (Discussion closed)
  • #30

    danny (Friday, 22 January 2021 14:23)

    good afternoon. Your ESP32-CAM project is splendid. Well done. Would you be able and willing to share the code. Much appreciated. email: danny.mcalbu@gmail.com. Thanks

  • #29

    moses (Wednesday, 30 December 2020 09:49)

    hello the project is very interesting. I would be very grateful if you could share the code?
    my email: rabbiwest@gmail.com

  • #28

    Tony Le (Sunday, 09 August 2020 04:14)

    hi, I like this 3D printed precision peristaltic pump and want to download this file printing. Can you show to me ? Thanks !
    https://www.youtube.com/watch?v=zLDlSd56vko

  • #27

    Ari (Tuesday, 05 May 2020 17:16)

    Hello Sir, im in interest for make this project , is possible that you share the code or at least could you give me an example, i got some trouble when use universaltelegrambot in esp32 is still cant find solution my email arirehan10@gmail.com , really happy if i get you attention .

    best regard

  • #26

    Javi Morales (Sunday, 26 April 2020)

    Hi,
    This model looks very interesting, congratulations. Would it be possible to share the 3D printer files and also the arduino code with the libraries you used, pleas! Thanks.
    J.M.

  • #25

    antonio couto (Friday, 24 April 2020 02:35)

    Hi,
    Would it be possible to share the arduino code for this project. I would like to implement it on my 3d printer My e-mail is antoniompcouto@gmail.com
    tks

  • #24

    Andre Geyser (Sunday, 12 April 2020 12:57)

    Hi,
    Would it be possible to share the arduino code for this project. I would like to implement it on my ESP32-CAM? My e-mail address: andre.geyser@telkomsa.net

  • #23

    Yanwar (Friday, 06 March 2020 08:23)

    Hello Sir, im in interest for make this project , is possible that you share the code or at least could you give me an example, i got some trouble when use universaltelegrambot in esp32 is still cant find solution.my email yanwareko.m@gmail.com, really happy if i get you attention .

    best regard

  • #22

    tornado64@gmail.com (Friday, 28 February 2020 01:36)

    Hello.
    I like it. Is possible that you share the code?
    my email is: tornado64@gmail.com
    Thanks

  • #21

    bruno martineze (Sunday, 23 February 2020 17:44)

    Congratulations! Im looking for a project like this. Can you share de code? brunomarcio.agl@gmail.com

    best regards,

  • #20

    Reham (Thursday, 26 December 2019 17:18)

    Please, can you send me the CAD files for this design?

  • #19

    Toyran (Thursday, 31 October 2019 10:21)

    Thank you for your quick response !
    I mean the Modular Chemistry Analyzer project,
    just the part of making multiport selector valve.
    I can not understand the mechanism purely.

  • #18

    dptechnology.jimdo.com (Wednesday, 30 October 2019 18:35)

    Dear Toyran,
    this guestbook is about the whole website. Which project are you referring to?

    dp

  • #17

    Toyran (Wednesday, 30 October 2019 18:26)

    Hi, I am trying to make the valve for my project but I can not understand the mechanism by looking at photos . Can you send me the method to make this please ?

    email: e.toyran_@Hotmail.com

  • #16

    David Coronado Ecos (Wednesday, 31 July 2019 16:28)

    hi, your work impresed me , i would like to probe it with my 3d printer , could you please send me the cad files?
    my email: davicoecos@gmail.com

  • #15

    Shawn Alfaro (Sunday, 28 October 2018 14:08)

    Do you offer .stl files for printing? If so, my email issalfaroart@gmail.com

  • #14

    Be (Saturday, 27 October 2018)

    b,van,hattem@xmsnet.nl

  • #13

    Be (Saturday, 27 October 2018 18:27)

    I wil also make this multi port valve for my project.Can you send me the method to make this.Thanks you

  • #12

    SANDEEP KUMAR (Friday, 28 September 2018 10:19)

    I want to make this multi port valve for my project.Can you send me the method to make this.Thanks you
    Email-
    sandeep.ec72@gmail.com

  • #11

    dpt (Saturday, 10 September 2016 17:58)

    Caro Pasquale,
    l'esp8266 è stato programmato usando l'IDE di arduino (https://github.com/esp8266/Arduino). Per quanto riguarda il codice che ho scritto e le librerie che ho usato per i bot, dovrei controllare sul computer, ora non ricordo... Se ti servono mandami una email alla sezione contatti e te le allego appena ne ho l'occasione.
    saluti, dp

  • #10

    Pasquale (Friday, 09 September 2016 13:43)

    Scisa, non avevo capito.
    Mi riferisco al progetto
    IoT: control esp8266 from Telegram Bot for telemetry and domestics applications
    Sto cercando di utilizzare un ESP-01 interfacciata con Arduino per utilizzare I Telegram BOT ma sono in difficolta' perche, mi pare di aver capito, che tutte le librerie disponibili non gestiscono I telegram BOT utilizzando I comandi seriali di ESP-01 ma utilizzano ESP-01 programmato tramite LUA.

    Darei quindi interessato alla tua soluzione.

    Grazie.

    P.S. Molto cortese nella sollecita risposta.

  • #9

    dpt (Friday, 09 September 2016 12:57)

    Ciao Pasquale,
    a quale progetto ti riferisci?
    Il libro dei commenti riguarda tutto il sito!
    dp

  • #8

    Pasquale (Friday, 09 September 2016 11:51)

    Progetto molto interessante.
    E' possibile avere I dettagli ed eventualmente il codice SW?

    Grazie

  • #7

    Marc (Saturday, 27 August 2016 07:59)

    It’s my fortune to go to at this blog and realize out my required stuff that is also in the quality.

  • #6

    dpt (Thursday, 26 May 2016 13:42)

    Hi Anibal,
    contact me tomorrow at info.dptechnology@gmail.com, i will provide you with the libraries used in the project. Regards

  • #5

    Anibal Marcos De Simony (Thursday, 26 May 2016 03:48)


    Caro , come è possibile accedere al progetto software : " ESP8266 e Telegram Bot ". migliori saluti.
    Anibal Marcos
    anibaldesimony@gmail.com

  • #4

    dpt (Tuesday, 05 January 2016 13:38)

    Hi markc,
    a preliminary hydraulic schematic was added yesterday :)

  • #3

    markc (Tuesday, 15 September 2015 16:05)

    When will you add the schematics of the automatic titrator?
    thanks

  • #2

    Federico (Monday, 14 September 2015 18:26)

    What about creating a community around the most ambitious projects? :D

  • #1

    Federico (Monday, 14 September 2015 18:14)

    Well done! This is smth we did need in Rome :)